Home » Articles posted by Cameron Logan
Author Archives: Cameron Logan
Insulation Removal – Safety and Effectiveness
Insulation is an important part of regulating the temperature of your home. Old or damaged insulation can lead to higher energy bills and reduced comfort in your home.
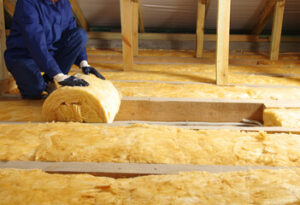
Insulation removal is a messy job, so you should prepare for a mess by covering items in your living space with plastic and wearing protective gear like gloves, goggles, and full body coveralls. You also need a respirator to prevent dust and other contaminants from getting into your lungs. Reach out Insulation Removal Perth for comprehensive assistance.
Insulation removal requires that professionals follow specific protocols for the safety of those performing the task. This includes proper ventilation to prevent inhalation of particles and fibers. It also involves sanitizing and disinfecting the work area before and after each step of the process to minimize contamination. Professionals also use specialized equipment to ensure that any insulation materials they remove are channeled outside without spreading into other areas of the property.
Old insulation may contain hazardous materials, such as asbestos, that could pose health issues. It is important that these materials are removed according to strict guidelines and that any asbestos-contaminated insulation is properly disposed of. Professionals who perform insulation removal services are trained in these methods and have access to designated facilities for disposal.
Before beginning the removal process, it is essential to create a plan for the project. This can help to reduce the risk of injury and to ensure that the job is completed efficiently. This plan should include an assessment of the area to be insulated, as well as any potential hazards, such as pests or mold infestations. It should also establish a path for debris removal and containment.
When removing insulation, it is best to wear protective gear such as masks and gloves. This will prevent any particles or fibers from contacting skin, which can irritate or cause respiratory problems. It is also advisable to wear coveralls.
Insulation can be dangerous to handle, especially when it contains materials such as vermiculite or mineral wool that may contain asbestos, a carcinogen that can cause mesothelioma and other health issues. When working with these materials, it is essential to wear full-coverage clothing, including long sleeves, pants, a hat, and closed-toe shoes.
Those who are not familiar with the appearance of older insulation products can easily make mistakes when trying to remove it themselves. For example, some types of attic insulation can conceal weak spots in the ceiling that could collapse under someone who steps on them. This can lead to serious injuries and costly home damage.
Hiring a professional to conduct Insulation Removal is a safe and efficient way to avoid these dangers. Professionals will create a plan for containing and removing all hazardous materials, as well as ensuring that they are disposed of in accordance with local regulations. Additionally, they will use a high-powered vacuum to remove insulation material from the attic or crawl space and direct it out through an external vent.
Preparation
Insulation removal can be performed as part of a home improvement project or as a necessary repair in older homes. The process involves removing and replacing old or damaged insulation to prevent energy loss, lower energy bills, and improved comfort. When performing insulation removal, there are several important steps that must be followed to ensure safety and effectiveness.
The first step is to identify the type of insulation in the attic. This will help determine the type of removal method needed, as different types of insulation require different removal techniques. A professional attic inspection can help homeowners accurately identify the type of insulation and spot potential hazards, such as water damage or pest infestation.
Once the type of insulation is determined, the attic or crawl space should be cleared and prepared for work. This includes turning off or disconnecting any power in the area and securing electrical wiring to minimize risk of damage or injury during the removal process. The area should also be cleaned and ventilated to reduce risk of health issues and promote a clean working environment.
It is essential to choose a qualified provider for Insulation Removal. A reputable company will have experience with the specific type of insulation in your attic and will follow strict safety protocols to ensure your family’s safety. It is also beneficial to select a comprehensive provider that can provide additional services, such as air sealing or installing new insulation, to streamline the overall project and save time and money. Personal referrals and online reviews can help homeowners evaluate providers.
During the insulation removal process, it is important to carefully cut and remove sections, avoiding damage to the walls or structure. It is also crucial to inspect the space after completing the removal to ensure that all hazards have been addressed and that no debris or old insulation remains in the attic or crawl space.
Once the workspace is clear, it is essential to vacuum the area thoroughly to eliminate dust and particles that may be released during the removal process. This step is also an opportunity to check for air leaks, seal them as necessary, and install vapor barriers if moisture is a concern. Once the area is vaccumed and clean, it is ready for a new layer of insulation. Homeowners can choose from a variety of insulation options, including fiberglass, cellulose, and foam board. Each option offers unique benefits and works best in particular climates.
Equipment
Insulation removal is an invasive task that can be dangerous to do without the proper equipment. The process can expose individuals to a range of health risks, including respiratory issues, allergies, and cuts. Additionally, working with old insulation materials like asbestos or older fiberglass insulation can be extremely dangerous.
Safety equipment is essential when performing this work in cramped spaces, at heights, and with hazardous materials. The most important piece of safety equipment for Insulation Removal is a hard hat that protects the head from falling debris and other hazards. Other safety equipment includes protective gloves, eye goggles, and a dust mask. These items can be purchased at most home improvement stores and are vital for protecting workers from airborne insulation particles.
An insulation removal vacuum is another important piece of equipment needed for this type of work. These powerful machines can remove large amounts of insulation in a relatively short period of time. They are ideal for removing blown in insulation from attics and basements. Ideally, the vacuum should be fitted with a specialized suction hose that is designed specifically for this type of job. This hose can be made of either wire or a ribbed polypropylene material, and should be used according to manufacturer instructions.
Before beginning the insulation removal process, it is important to create a plan and prepare the workspace. This should include assessing the area and noting the type of insulation present. It is also important to identify any potential hazards in the work area, such as electrical wiring or junction boxes. Once the workspace is clear, it is necessary to turn off the power and disconnect any live wires in the area. This eliminates the risk of electric shock and fire, and can help ensure a safer work environment.
Once the insulation is removed, it should be disposed of properly. It is important to place a tarp under the bags to prevent them from getting wet and creating a mess. It is also a good idea to put the bag contents in a dumpster or other designated waste container for disposal.
Disposal
Insulation is a great way to add comfort and energy efficiency to your home or business, but it can be damaged by pests, rodents, water damage, or simply wear and tear. These damages can lead to health risks and poor energy efficiency, making it important to have old insulation removed and replaced as soon as possible.
It is a good idea to have the removal done by professionals, but you can also perform it yourself if you follow some basic safety precautions. Always wear a mask and goggles, especially when removing spray foam. The chemicals in the spray can cause lung damage if you inhale them for long periods of time, so it is important to work in a well-ventilated area.
The type of insulation that is most common in homes is blown-in fiberglass or cellulose insulation. This can be difficult to remove without professional equipment, but it is possible. For blown-in insulation, you will need a specialized HEPA filter rated vacuum with a large capacity and high power to effectively suck up the material. A lot of dust and debris can be generated during the process, so it is a good idea to cover any exposed surfaces with plastic sheeting or tape to contain the mess.
You will also need a few large, heavy-duty garbage bags to hold the waste from the insulation, so be sure to have these on hand when you start working. You can dispose of the insulation at a local recycling or waste management facility, but it is best to consult with them first to see what the proper procedure is for your particular area.
The main reason to have insulation removal performed is to improve your home or business’s energy efficiency. By removing the damaged and outdated insulation, you will make it easier for your newer insulation to be installed, which will give your property more efficient performance and save you money on your heating and cooling bills. Other reasons for having insulation removal performed include upgrading the existing insulation to a higher level, or if you are doing a renovation project that will change walls, ceilings, or floors where insulation is located.
How Plumbers Repair Leaky Faucets
Plumbers In Spring TX install, repair, and maintain pipes and fixtures in residential and commercial buildings. They also use their skills to interpret blueprints and building codes when installing new plumbing systems.

Plumbers must have excellent problem-solving skills to address customer issues quickly and effectively. They also need strong analytical thinking and critical-thinking skills to weigh their options in high-pressure situations.
When you have a leaky faucet, it not only wastes water but can also lead to costly repairs and water damage. In addition, constant drips can erode fixtures, causing them to break down more quickly. Homeowners should take a proactive approach to their plumbing and check for leaky faucets regularly. If the problem is caught early, it can be relatively inexpensive to repair.
Leaks can occur in a variety of places, from the water supply pipes to the shut-off valves or the flexible supply tubes that run from those valves to the faucet itself. Whether the problem is a simple loose connection or a more serious issue, a plumber can help resolve it.
One of the most common causes of a leaky faucet is worn-out washers or O-rings. These small parts are inexpensive to replace and can make a big difference in eliminating the drip. It’s a good idea to replace these parts on a regular basis, as soon as you notice them starting to wear out, in order to prevent future problems.
In many cases, the cause of a leaky faucet is water sediment buildup. Over time, these deposits can corrode the inlet and outlet seals, leading to a leak. Cleaning the faucet regularly with a gentle cleaner can prevent this from occurring.
Before you start working on a leaky faucet, it’s important to turn off the water supply to the house. This will protect you from water gushing out of the faucet in the event that you’re not careful while you work. It’s also a good idea to cover the sink drain with a rag before you begin working, as small parts can easily fall down the drain.
Next, remove the faucet handle by unscrewing it with an Allen wrench or a Phillips-head screwdriver. Once the handles are removed, you can access the hex head of the valve stem assembly. You may need to remove a decorative cap from the top of the assembly, which can be done with a flathead screwdriver. Once the hex head is exposed, grip it with pliers and unscrew it counterclockwise. Once the nut is loose, you can pull out the stem and examine the O-rings and seat washer for signs of wear. If they’re damaged, you can purchase replacements at your local hardware store.
Squeaky Faucets
The handle of a faucet can rub against the valve stem when it is turned, creating friction and leading to a squeaking noise. This can be a result of misalignment or corrosion. Oftentimes, the problem can be resolved by applying plumber’s grease or a silicone-based lubricant to reduce the friction between the handle and valve stem. A squeaky faucet can be difficult to diagnose, but careful inspection can help identify the source of the problem. First, turn the water on and off while listening closely for any squeaking. It is also helpful to inspect the entire faucet for any signs of damage or loose components. Once you have located the source of the squeaking, it is time to begin the repair process.
If the squeaking is caused by a misaligned handle, you can usually fix it by turning the handle clockwise until it stops making the noise. Then, tighten the screw that holds the handle in place. If the squeaking continues, you may need to replace the washer or the valve stem.
Another common cause of squeaky faucets is high water pressure. This can put undue stress on your pipes and lead to problems like leaks and water hammer. To reduce your water pressure, you can install a water pressure regulator or reduce the amount of hot water you use.
A squealing sound when you run hot water is most commonly caused by water hammer, which occurs when water travels quickly and abruptly comes to a stop. The resulting shockwave can cause the pipes to vibrate and make a thudding or banging noise. To prevent this, you can hire a plumber to install water hammer arrestors in your home or simply switch out metal support brackets for plastic ones.
If the squeaking is caused from a stuck handle stem, you can try to dislodge it by using pliers or a hammer. If this does not work, you can try heating the handle with a hairdryer to loosen it. If all else fails, you can use a handle puller to remove the handle.
Faucets That Don’t Turn On
The faucets in our homes take a lot of abuse. They are turned on, off, and on again several times a day and are subjected to the corrosive minerals in our water, extreme temperature changes, and unkind human treatment. This constant use and abuse can cause them to eventually break down and stop working. When this happens, you will need to hire a plumber to come out and repair the broken faucet.
One of the most common reasons for a faucet not to turn on is that it’s simply closed. This can happen if someone worked on the sink recently and forgot to turn the water back on. Alternatively, it could be a result of a water supply problem that is out of your control. If you are unable to open the valve, contact your local water department to see if there is an issue in your area.
Another possible reason for a faucet not turning on is that there is a mineral buildup in the cartridge or stem, which restricts movement and makes it difficult to turn the handle. This can be fixed by removing the cartridge or stem and using a mineral-removal product to clean them. Once the components are cleaned, you can reassemble them and use plumber’s grease to help lubricate them. This will make it easier to turn the handle and shut off the water.
It’s also possible that the handle itself is broken or damaged. This is a common problem that can be caused by wear and tear, corrosive materials in the water, or improper installation. It’s important to have a professional install your faucet to avoid this problem in the future.
If none of the above problems are causing your faucet to not turn on, there may be an issue with the piping that is connected to it. You should be able to tell by looking at the piping under your sink that there are two separate water lines for hot and cold. If you are unable to find any obvious issues, try shutting off the water supply by locating the valves underneath your sink and turning them clockwise.
Faucets That Are Corroded
A corroded faucet can cause a number of issues. The corrosion can cause the water inlet ports to deform and lead to water leaks. It can also prevent the washers and seals from sealing properly. Additionally, it can damage the spout and handle. Fortunately, plumbers can repair corroded faucets.
A plumber who is licensed will have a better reputation than one that works for a “Chuck in the Truck.” Unlicensed plumbers may save you money but they can cause expensive problems in the future. For example, they may tighten a fitting too much, leading to a small leak that you don’t notice at first but will become worse over time. A professional plumber will use the proper tools and techniques to ensure that the job is done correctly.
Another common issue is a leaky faucet. Leaking faucets can cause water to be constantly wet, which can damage the sink and countertop. In addition, the wetness can encourage the growth of rust or moss. These stains can be difficult to remove and may require professional help.
Plumbers who work in commercial and industrial buildings must be able to deal with larger plumbing systems that serve multiple occupants. They are responsible for installing, maintaining, and repairing systems that include water supply lines, drainage systems, fire sprinklers, and complex industrial plumbing equipment.
One of the most common causes of a leaking faucet is mineral buildup. This is caused by a hard water supply or rust from a faucet that’s been left to deteriorate. Using vinegar can help to clean the buildup.
A plumber can also fix a leaky faucet by replacing the O-ring on the stem. These can range in size from 3/8 – 5/8 of an inch and need to be replaced when they are damaged or worn down. A new O-ring can be purchased at a hardware store and should be coated with nontoxic plumber’s grease before being installed. Lastly, the washers and seals on the cartridge or stem need to be replaced when they’re worn down. These can be purchased at a hardware store or at a home improvement center.
Tile and Grout Cleaning – How to Keep Your Tiles and Grout Clean
Cleaning and maintaining your home’s tile and grout surfaces can be a challenging task. Fortunately, Tile And Grout Cleaning Perth can help keep your grout clean.
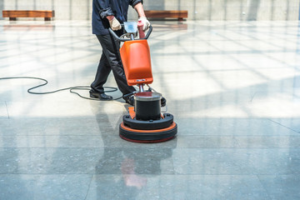
Start with a thorough inspection. Professionals use detailed tile and grout cleaning to identify and prioritize areas that need extra attention.
Tile adds a touch of texture and beauty to various spaces in your home, including kitchens, bathrooms, patios, and more. They are also extremely durable and long-lasting, but if not regularly cleaned and sealed, they can become dingy and discolored. When this happens, it not only looks unattractive but can also serve as a breeding ground for germs and bacteria that put your family’s health at risk. Regular cleaning by a professional is essential to keep your home’s tiles looking their best and hygienically clean.
Professionals use a detailed process that includes vacuuming or sweeping to remove dry dirt, washing and rinsing the tiles, and then drying them thoroughly. They will even apply a transparent sealant that not only protects your grout from future stains but extends the life of your tile floors as well.
Aside from removing unsightly stains, a tile and grout cleaning service will eliminate bad odors often appearing in bathrooms and kitchens. These odors are caused by mold and mildew that develop in hard-to-reach places exposed to dampness and insufficient sunlight. When a mold or mildew problem is left unattended, it can lead to more serious health issues for small children, elderly adults, and asthma patients. A professional cleaning will eliminate these odors and protect your family’s health.
When you have your tile and grout professionally cleaned, the results are immediate. Unlike a DIY hack, professional cleaners use powerful extraction equipment and cleaning solutions that loosen embedded dirt and restore your tile and grout’s appearance. If you plan to do the cleaning yourself, ensure you’ve removed all furniture and rugs (using felt pads or other methods that won’t damage your tile) and any breakables from countertops, built-ins, or shelves.
Grout is porous and absorbs liquid stains like a sponge, making removing it difficult. Using a scrub brush or chemical cleaners can cause the staining to worsen. Professionals understand the importance of thoroughly cleaning and using high-powered equipment to ensure your grout is fully clean. They will also sanitize and deodorize your tile, stone, and grout surfaces for an overall clean.
Anyone who has spent time on their hands and knees scrubbing dirty tile and grout knows how much work it is to get the flooring looking clean again. Finding the right cleaning solution or technique is challenging, and hours of scrubbing only seem to improve the look marginally. Professional cleaners have the tools to do the job a fraction of the time, and they know what works and what doesn’t.
In addition to saving time, hiring a professional also saves money. Using the wrong cleaning solution can damage grout and even cause it to break apart. The right cleaners will not only clean your tile and grout, but they will also reseal it to make it resistant to future stains and moisture. This will reduce the need for regular scrubbing and keep the tiles in pristine condition longer.
Grout is porous and easily absorbs odors, dirt, grime, and harmful germs. When these contaminants sit on the grout, it can lead to mold and mildew growth. This can be a serious health hazard, especially for families with young children or elderly adults. Aside from being a safety hazard, mold and mildew can be difficult to remove and leave behind a musty odor. Experts in tile and grout cleaning will use specialized equipment to remove the mold and can offer a treatment that will seal the grout to prevent it from growing again.
Aside from saving you time and money, tile and grout cleaning can enhance the look of your home or business. It can make a room seem larger and brighter and can make it feel more welcoming to guests. It is a great way to improve the look of your home or business and is often a good investment when it comes time to sell.
Keeping your tile and grout clean is important for both the look of your home or business and your health. Hiring a professional cleaner is an affordable and convenient option for getting your tiled surfaces looking like new again. The peace of mind that comes with knowing that your cleaning company will do the job quickly and correctly is well worth the cost and can help you protect your investment.
Tile and stone add texture and charm to various areas in your home, like bathrooms, kitchens, patios, and more. They’re also durable and unique. However, these materials are quite difficult to clean — especially the grout. Grout is often filled with mold, mildew, and bacteria spores that can make your home appear dirty and dingy, as well as pose real health risks to children, older adults, and asthmatics.
When cleaning your tiles and grout, buying a cleaning solution at the store will be the most cost-effective option. However, this can become more expensive in the long run if you have to buy multiple cleaners before finding one that works, and you’ll likely waste some of the product in the process. Hiring a professional saves you from this hassle and ensures that the job will be done right the first time.
Furthermore, professional cleaners have powerful equipment unavailable to the general public. They can use these tools to get your grout as clean as possible without damaging it or leaving behind residue. In addition, they can apply a transparent sealant after cleaning that will protect your grout and keep it looking fresh for a longer period.
It’s also worth noting that professional cleaning services can be far more effective at removing stubborn stains than any DIY hack you might come across online. This is because professional cleaners know how to identify the type of tile you have properly and can use a cleaner that will give you the best results without damaging your tiles or grout.
Regularly getting your tile and grout cleaned is the best way to prevent dirt buildup and prolong its lifespan. A good rule of thumb is to have your tile and grout professionally cleaned every three years or so. It would be best if you also had your grout sealed after each cleaning to prevent the growth of microbes that can eat away at it and cause it to crumble prematurely. This will also protect your investment and help it last longer.
Homeowners know that having clean tile surfaces can brighten a room and make the house feel fresher and more welcoming. However, over time, the everyday wear and tear on tiles and grout can leave them looking dingy. In addition, scrubbing the tile and grout with traditional household cleaning products can still leave behind stubborn stains that are impossible to remove. Rather than struggle to keep your tile and grout looking beautiful, let the professionals help. Having professional tile and grout cleaning done every couple of years can extend the life of the tile, offer protection from damage, and prevent the buildup of germs and bacteria hiding in your tile grout lines.
Many DIY cleaning products are full of harsh chemicals and acidic solutions that can damage your grout and cause the tiles to become dull or discolored. Professionals, on the other hand, use cleaning solutions that are specifically built for your tile and grout type and don’t contain any harmful chemicals or acids.
Another great thing about having a professional cleaning service is that they can eliminate the buildup of mold and mildew in your grout lines. This buildup is caused by the natural growth of bacteria in damp environments. This is especially dangerous for children and pets and can lead to breathing problems and allergies. Regularly having your grout professionally cleaned by a trained and experienced technician can eliminate the buildup of these allergens, keeping you and your family healthy.
The bottom line is that hiring a professional to come and clean your tile and grout will save you a lot of time, money, and headaches. Instead of trying to get the job done yourself with all the equipment and cleaning materials that you would need, give us a call. We will be there quickly, work efficiently, and get your tile and grout back to its original luster in no time.
To get your tile and grout looking their best:
- Sweep and vacuum regularly to remove loose dirt and dust.
- Sanitize your tile floors with a manufactured cleaner or create a natural cleaner by mixing water and dish soap.
- Spritz the surface of your tile and grout with the cleaner and allow it to set for a few minutes before wiping it down.
- Rinse thoroughly with hot water to remove any remaining residue.